Knowledge Base
Search by either entering keywords or by selecting a product.
Secure your TeraStation by installing free SSL certificates from Let's Encrypt
Applies to:
TeraStation 5010/3010/3020/6000 series
Note: This knowledge base article includes the following 3rd party software and websites for demonstration purpose only.
https://www.openssl.org
https://www.openssl.org/community/binaries.html
https://letsencrypt.org
https://letsencrypt.org/docs/client-options/
https://community.letsencrypt.org/t/web-browser-based-acme-clients/72957
https://gethttpsforfree.com/
https://github.com/sverrirs/GetHttpsForFree-UI
https://www.duckdns.org/
Introduction:
For secure network communication to your TeraStation NAS, you can obtain free HTTPS certificates from the non-profit certificate authority Let's Encrypt! for your TeraStation NAS.
Please note a LetsEncrypt certificate is only valid for 3 months. You will have to recreate or renew the certificate after 3 months.
Before You Begin:
Register a domain name from a third-party domain provider, and setup a A record that points to TeraStation WAN IP address.
Make sure the domain provider supports Let’s Encrypt DNS validation especially if you are using a free DDNS provider.
Please see more info at
https://letsencrypt.org/docs/challenge-types/
https://community.letsencrypt.org/t/dns-providers-who-easily-integrate-with-lets-encrypt-dns-validation/86438
Let’s Encrypt clients:
To get a Let’s Encrypt certificate, you’ll need to choose a client software to use. Let’s Encrypt uses the ACME protocol to verify that you control a given domain name and to issue you a certificate. There are various of client options:
https://letsencrypt.org/docs/client-options/
https://community.letsencrypt.org/t/web-browser-based-acme-clients/72957
For demonstration, we will use a Web browser based ACME client (gethttpsforfree.com) in this article.
Note: This site (gethttpsforfree.com) is a PHP page that was created by a 3rd party to generates the necessary files and then connects to Let's Encrypt's server to get the SSL issued.
Create a Certificate:
Create a CSR and Private Key file using the Let's Encrypt' web client and the OpenSSL tool installed on your PC/Server.
For Windows OS environment, in this article we are using OpenSSL for Windows OS, which is developed by OpenSSL community members. This can be downloaded from https://www.openssl.org/community/binaries.html
The Linux OpenSSL package can be downloaded from: https://www.openssl.org/
Note: Some of the Linux based commands listed on the (gethttpsforfree.com) webclient might not be compatible with OpenSSL for Windows OS version which will result errors. There is also an assisting application called “GetHttpsForFree-UI” that can semi-automate the process on gethttpsforfree.com for Windows OS users.
https://github.com/sverrirs/GetHttpsForFree-UI
Before starting, you may need to locate and manually change the OpenSSL configuration file.
Linux:
#change "openssl.cnf" as needed.
Windows:
#follow the instructions of the “GetHttpsForFree-UI” helper
1. Use your internet browser on your PC to access the web client https://gethttpsforfree.com/
2. Follow Step.1 on the web client and execute them by your local OpenSSL to create an Account-Private-key. Copy and paste the output Account-Public-key back to the webclient and validate for the next step.

3. Follow Step.2 of the web client and execute them by your local OpenSSL to create Domain-Private-key and Certificate signing request (CSR). Copy and paste the output CSR back to the webclient and validate for the next step.

4. Sign all of your API requests with your account private key.
Copy-and-paste the generated commands from the webclient into your OpenSSL terminal. Copy and paste the hex encoded signature output from the terminal into the text field below that command.

5. Domain Challenge
Copy and paste the command to requests the challenges you need to complete in order to make sure you control a domain in your certificate order.
For more challenges information please refer to the Let’s Encrypt website.
We are using the “DNS record” challenge in this example.

After completed the challenge, continue to execute the commands to finalize order and generate certificate.

6. After the Certificate is generated, Copy and paste the certificates (the text contains both your domain certificate and intermediate certificate) into a text file called "chained.pem". You now have a valid certificate from Let's Encrypt.

Install Certificate to TeraStation:
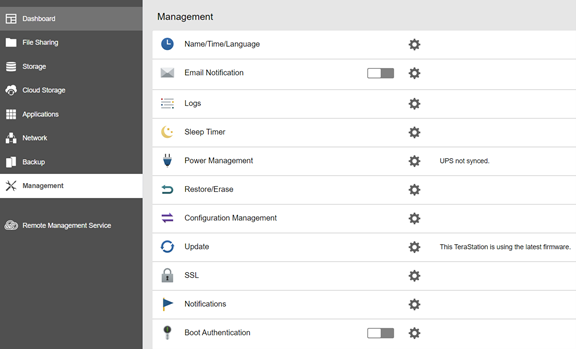
1. Logon to your TeraStation WEBUI. Navigate to the Management tab.
2. At the right, click the edit icon besides “SSL”
3. Secret Key: Browse and select the "domain.key" that you generated using OpenSSL
Server Certificate: Browse and select the " chained.pem " that you got from the Let's Encrypt client.
Then Click Import.

Certificate installed succeeded.

Important Notes:
o The certificate file needs to be a Base-64 encoded X.509 cert.
o The key file needs to be a Base-64 encoded file.
o The files can be uploaded from a directory path or the root directory of the C
o TeraStation currently does not support Let's Encrypt “Intermediate certificate”, please do not upload.
o If you encountered an error when uploading a valid certificate & key, please try to use web browser’s private mode or a different web browser to access the WEBUI then try again.
Verify Certificate installation
1. Check if the certificate is valid from your Web browser

2. Use 3rd party SSL checker, such as:
www.ssllabs.com/ssltest
whynopadlock.com
www.geocerts.com/ssl-checker
Note: If your NAS is behind a firewall or router, setup port forwarding on HTTPS port 443 to your NAS’ internal IP for allowing HTTPS access from internet.