Knowledge Base
Search by either entering keywords or by selecting a product.
Configuring WebAccess on a Buffalo TeraStation 5010/3010/3020/6000
Applies to:
TeraStation 5010/3010/3020/6000/7010/5020 series
LinkStation 700 series
WebAccess is a feature of many Buffalo devices that allows you to create a personal cloud for easy remote access and file sharing with anyone, anywhere over the Internet. Your data remains securely stored in one place on your home or small office network, but you can access it quickly from any computer or mobile device over the web.
Almost all home or small business networks employ a firewall of some kind to separate computers and other devices on the local network from the Internet. This is necessary to help prevent unwanted users from accessing private user systems, which could result in user data loss or corrupted devices.
In order to enable WebAccess on a TeraStation, it is necessary to allow limited communication from the Internet through the firewall to the TeraStation. This is done by opening a port (a kind of virtual door) on the firewall for this specific service. The "door" will have a specific label known as a "port number" on the outside, or Internet side, and a different label (port number) on the inside (internal network side). The device that contains the firewall, usually a wireless router or ISP (Internet Service Provider) supplied modem/gateway will need to have specific instructions on how to handle this virtual door. Those instructions are called "port forwarding".
Essentially it says "when internet traffic/requests come in directed to this specific port number then forward that traffic to this internal IP address on this specific port number". This enables WebAccess traffic to pass through the firewall without exposing the entire TeraStation to the internet at large. For this reason any device with WebAccess enabled should have strong, secure passwords set for all users!
Note: WebAccess also cannot be used if your ISP uses Carrier Grade NAT (CGNAT) which does not provide a real public IP-address. Contact your ISP about this.
For more information on setting up port forwarding on a Buffalo AirStation, see here.
Note: Be careful when configuring WebAccess. Certain settings can make the files in the shared folder available to anyone on the Internet, without any access restrictions.
Setup WebAccess
1. Open the user interface for the TeraStation. Navigate to the “File Sharing” tab. Click on the configuration icon next to WebAccess.

2. Click Edit to configure the options.

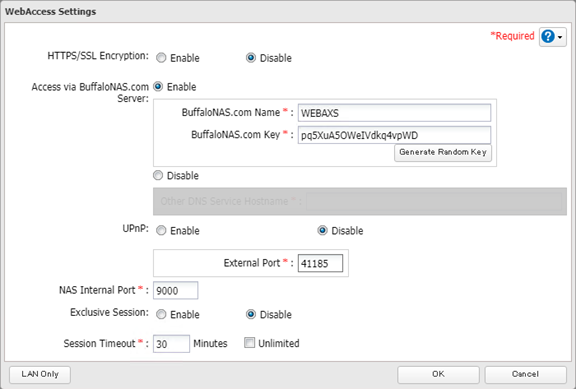
3. To use SSL encryption for more secure data transfers, enable “HTTPS/SSL Encryption”.
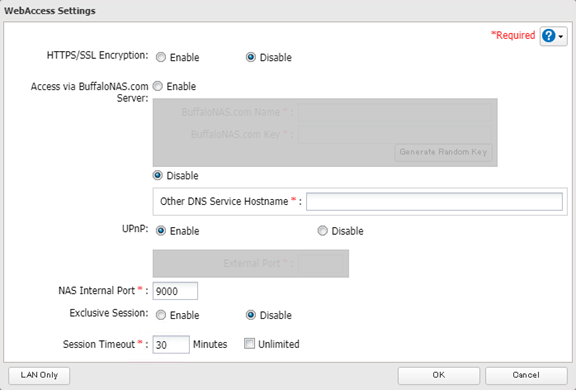
4. You have the option to register a name with BuffaloNAS.com to access your TeraStation.
Note: Buffalonas.com is a DNS service provided by Buffalo. If you wish to use another DNS service select the option to disable buffalonas.com registration.
Choose a “BuffaloNAS.com Name” and “BuffaloNAS.com Key” for your WebAccess account. Names and keys may contain between 3 and 20 alphanumeric characters, underscores (_), and hyphens (-).

If you are planning to access the NAS only from your LAN, disable BuffaloNAS.com registration and click “LAN Only” button at the lower left of the window.
5. You can also determine which external and internal TCP ports will be used by the WebAccess service and whether multiple sessions will be allowed. With some routers you may be able to configure the ports using the UPnP (Universal Plug and Play) feature of the router. This feature is not implemented identically in all router brands so it may or may not work. If it does not work you will need to configure the ports and port forwarding manually.
Note: To determine what external ports are available in your environment, contact your internet service provider (ISP). You will need to configure port forwarding on your router in order to use WebAccess. Please see the user's manual for your router for instructions on setting up port forwarding. If you have a Buffalo router you may be able enable the UPnP (Universal Plug and Play) setting to automatically configure port forwarding. For more information on setting up port forwarding on a Buffalo AirStation, see here.
It is recommended to use a static IP address on the TeraStation when using WebAccess to prevent loss of access due to a change in the IP address of the TeraStation. For instructions on setting a static IP address on a TeraStation see here.
6. Once all the settings are correct click OK.
7. If the following notification appears, click OK.

8. 5. On the main page of the interface click the virtual slide switch to enable WebAccess.

WebAccess should now be enabled. To test access go to BuffaloNAS.com from a computer outside your network and enter the name you assigned. You should be taken to the WebAccess interface for your TeraStation. If this does not work the most likely cause will be either incorrect port forwarding settings in the router OR you are attempting to use an external port that is blocked by the ISP.
Note: If you have enabled “HTTPS/SSL Encryption” but did not import your SSL certificate to your NAS, it is likely your browser will show the WebAccess as insecure site.
Refer to the following KB about installing SSL certificate on the NAS.
Secure your TeraStation by installing SSL certificates from Godaddy
Secure your TeraStation by installing free SSL certificates from Let's Encrypt
Select a shared folder to publish on WebAccess
1. Click the settings icon the right of “Folder Setup”.

2. Select a shared folder to publish.
Notes:
• For best results, create a new dedicated share for WebAccess.
• When accessing shared folders through WebAccess from a remote location, a username and password may be required for certain operations. For best results, create a user account with permissions on the WebAccess share before using WebAccess.
3. Under “LAN Protocol Support”, select the “WebAccess” checkbox on the
Basic tab.

4. Click the Option 2 tab.
5. Select the desired WebAccess security level for “WebAccess Permissions”.
Important: Configure this setting properly to avoid making the files in the shared folder available to anyone on the Internet, without any access restrictions.

Allow anonymous:
Anyone can access (view) shared folders. (Access restrictions configured for shared folders will not work.)
Allow all groups and users:
All groups and users registered on the Buffalo NAS device can use WebAccess. (Access restrictions configured for shared folders will not work.)
Use inherited folder permissions:
Users and groups have the same access permissions with WebAccess that they do locally. If access restrictions are not set for the shared folder, then this option will not be shown.
Note: Whether a user or group can access a folder through WebAccess depends on a combination of WebAccess settings and the shared folder’s settings.

Click OK when completed setup.